| PoorBoy's Prospecting |
|
A Simple Identification Kit
In order to use this identification key you will need to assemble an "Identification Kit". Here’s what you’ll need:
A piece of plain white paper (a blank specimen label works great.)
Your fingernails (preferable still attached to your fingers!)
A copper penny ( pre-1983; or small – ½ inch – piece of copper; or short piece of heavy copper wire.)
A small piece of fluorite (a broken cleavage piece is fine.)
A pocket knife (NOT a Swiss Army knife – the steel in those is harder than in most cheap pocket knives, which can throw hardness tests off.)
A small section of a steel file (a 2 or 3 inch tip from a triangular file for sharpening chain saws works fine.)
A piece of a quartz crystal (with at least one good face and a sharp point - a broken section usually has a sharp point on it somewhere, it doesn’t have to be a crystal termination.)
A small piece of a beryl or topaz crystal (with at least one good face and a sharp point or edge.)
A small piece of a corundum crystal (with at least one good face and sharp point or edge.)
A "streak plate" (unglazed porcelain tile – a 2 inch square is plenty.)
A short candle stub and matches or a cigarette lighter.
A small pair of tweezers.
A needle in a wooden dowel (for generating cleavage, etc.)
A small magnet (a refrigerator magnet is fine, but it should be a fairly strong one.)
A plastic dropper bottle for dilute (10%) HCl acid solution (Please read, understand and follow the label warnings and Material Safety Data Sheets when working with any hazardous material).
A 10x hand lens/jeweler’s loupe.
Blank specimen labels.
Pens or pencils.
Most of these items are for testing hardness, and there are more listed than the key itself requires. But when you get to the sections and have specific minerals in mind, the extra hardness tools will help you in determining whether or not your unknown has the specific hardness of one of the minerals listed. A hardness table is provide below showing the relative hardness of the items listed. The streak plate is used for obtaining a colored (or not) powder streak of the mineral. Many minerals give a different powder streak color than the mineral itself. (Such as black hematite giving its characteristic "rust red" streak.) The candle stub or lighter is used for doing basic fusibility tests – will a chip fuse in the flame? The tweezers keep your fingers from getting burned doing the fusibility test! A magnet is used for testing whether or not a sample is magnetic. A loupe is often necessary for examining broken mineral surfaces to check the cleavage. And figuring out what mineral you have would be a waste of time if you don’t label the sample – and forget what it is by the time you get around to looking at it again.
The items can be kept in a leather pouch, a small plastic box – or anything that’s the right size and durable. But it is a good idea to keep the kit items together in some sort of container. Then you always know where to find them when you need them.
Mineral Properties
In order to use this Key and the test kit described above, you need to understand some basic properties of minerals. The most important are: luster, streak, hardness, and cleavage. It is also good to know a bit about such things as specific gravity, fusibility, mineral "habits", and the types of mineral "environments" different minerals are likely to be found in – what types of rock, under what physical conditions. Brief discussions of the most important properties follow below. Any good mineral book should have more detailed sections discussing them, and the user of this Key is advised to get one and read it before working with this Key and the kit.
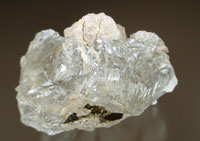
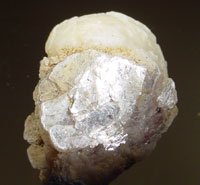
Luster: A mineral’s luster is the overall sheen of its surface – it may have the sheen of polished metal, or that of an unpolished metal that is pitted by weathering – or it may have the sheen of glass, or look dull or earthy, etc. Luster should not be confused with color: A brass-yellow pyrite crystal has a metallic luster, but so does a shiny grey galena crystal . Quartz is said to have a glassy (or vitreous) luster, but its color may be purple, rose, yellow, or any of a wide range of hues. The different types of luster referred to are:
In order to use this Key and the test kit described above, you need to understand some basic properties of minerals. The most important are: luster, streak, hardness, and cleavage. It is also good to know a bit about such things as specific gravity, fusibility, mineral "habits", and the types of mineral "environments" different minerals are likely to be found in – what types of rock, under what physical conditions. Brief discussions of the most important properties follow below. Any good mineral book should have more detailed sections discussing them, and the user of this Key is advised to get one and read it before working with this Key and the kit.
Luster: A mineral’s luster is the overall sheen of its surface – it may have the sheen of polished metal, or that of an unpolished metal that is pitted by weathering – or it may have the sheen of glass, or look dull or earthy, etc. Luster should not be confused with color: A brass-yellow pyrite crystal has a metallic luster, but so does a shiny grey galena crystal . Quartz is said to have a glassy (or vitreous) luster, but its color may be purple, rose, yellow, or any of a wide range of hues. The different types of luster referred to are:
Metallic, having the look of a polished metal;
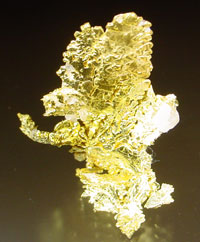
Gold, 3cm tall, California
Submetallic, having the look of a metal that is dulled by weathering or corrosion; and
Non-metallic, not looking like a metal at all. Nonmetallic luster is divided into several sub-types:
Adamantine, having the hard, sparkly look of a diamond;
Resinous, having the look of amber – not quite glassy
Glassy/Vitreous, having the look of glass;
Pearly, having the iridescent look of mother-of-pearl (though usually just barely); often found on the cleavage face of a mineral having perfect cleavage
Greasy/Oily, having the look of an oil-coated substance;
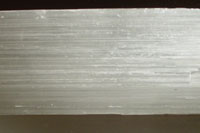
Silky, having the look of silk, fine parallel fibers of mineral – such as chrysotile "asbestos";
Dull, having a plain looking surface that is not submetallic;
Earthy, having the look of soil or clay.
Certain minerals with a resinous or adamantine luster – such as sphalerite and cinnabar respectively – can appear submetallic. Care needs to be taken in deciding which of these lusters a particular mineral has. Since getting the luster right is the first critical step in keying out a mineral, always do your best to determine what the luster of a "mystery mineral" is before going on to the next step. Return to Key: Step 1
Mineral Environments & Associations
Where a mineral is found – the type of rock in which it is found – and with what it is found – the other minerals that occur with it – can be as important to identifying the mineral as its physical properties. While there is not room for much of this information in the Key, the collector should pay close attention to it when they encounter it in field guides or other reference works.
Mineral Environments refers to the "geologic environments" in which minerals occur – the types of rocks in which they are found. While some minerals occur in two or more environments, others tend to be restricted to a single environment. If you think you have found the mineral kyanite in a sedimentary sandstone and see that it is a mineral formed by metamorphic processes you’ll know it can’t be kyanite. Try celestite… If you think you have found topaz in a cavity in basalt and read that it is largely restricted to pegmatite you’ll know it isn’t topaz. And so on. On a smaller scale, environments can vary over the volume of a single deposit. A lode of copper ores may have an oxidized zone (gossan) , a supergene enriched zone, and a deep primary zone. Each zone tends to produce distinct mineral assemblages. And figuring out in which zone a mineral formed leads to learning about mineral associations. Mineral Associations are simply that – what minerals occur with one another in what environments. Such as minerals like malachite and brochantite most often being found with chalcopyrite and pyrite. Or secondary phosphate minerals being associated with triphyllite or lithiophilite. If you think you’ve found vivianite in a pegmatite, but there is no triphyllite around, maybe that isn’t what you have… So it is always a good idea to pay attention to environmental information and any associations described. Sometimes an identification can be nailed down with that information – or one or more likely suspects eliminated by it. As stated above, this information is as important as the physical properties of the minerals themselves. Information about the minerals that have been found at a particular location is often available either on the web, in various "hobby" publications, the scientific literature, and in publications from the various state and national (United States) geological surveys. These mineral lists often contain descriptions of the mineral habits found at a locality, and can be an invaluable help in determining what mineral(s) you have. This is another reason why good record keeping about the locality where a specimen is from is extremely helpful.
Mineral Environments refers to the "geologic environments" in which minerals occur – the types of rocks in which they are found. While some minerals occur in two or more environments, others tend to be restricted to a single environment. If you think you have found the mineral kyanite in a sedimentary sandstone and see that it is a mineral formed by metamorphic processes you’ll know it can’t be kyanite. Try celestite… If you think you have found topaz in a cavity in basalt and read that it is largely restricted to pegmatite you’ll know it isn’t topaz. And so on. On a smaller scale, environments can vary over the volume of a single deposit. A lode of copper ores may have an oxidized zone (gossan) , a supergene enriched zone, and a deep primary zone. Each zone tends to produce distinct mineral assemblages. And figuring out in which zone a mineral formed leads to learning about mineral associations. Mineral Associations are simply that – what minerals occur with one another in what environments. Such as minerals like malachite and brochantite most often being found with chalcopyrite and pyrite. Or secondary phosphate minerals being associated with triphyllite or lithiophilite. If you think you’ve found vivianite in a pegmatite, but there is no triphyllite around, maybe that isn’t what you have… So it is always a good idea to pay attention to environmental information and any associations described. Sometimes an identification can be nailed down with that information – or one or more likely suspects eliminated by it. As stated above, this information is as important as the physical properties of the minerals themselves. Information about the minerals that have been found at a particular location is often available either on the web, in various "hobby" publications, the scientific literature, and in publications from the various state and national (United States) geological surveys. These mineral lists often contain descriptions of the mineral habits found at a locality, and can be an invaluable help in determining what mineral(s) you have. This is another reason why good record keeping about the locality where a specimen is from is extremely helpful.